Building It Step By Step
Model View Controller
Learn how to create a basic model–view–controller architecture.
Getting Started
Navigate to the corresponding folder:
cd step-2-model-view-controller
Install the dependencies:
npm install
Then run the project:
npm run dev
Model View Controller
The workflow functionality is built around a Model View Controller architecture, where the workflow state, its visual representation, and the logic that connects them are separated into distinct layers. The diagram below illustrates how its core types and functions interact.
![Architecture diagram showing the MVC data flow in Workflow Kit. The Workflow model (top-left) transforms into Flows via workflowView() (top-left to bottom-left). User interactions on Flows produce FlowsChange[] via onFlowsChange() (bottom-left to bottom-right). FlowsChange[] is converted to WorkflowChange[] via toWorkflowChanges() (bottom-right to top-right). Finally, WorkflowChange[] is applied back to Workflow via applyWorkflowChanges() (top-right to top-left), completing the cycle.](/md/mvc.png)
Types:
Workflow: The current workflow state (Model).Flows: The visual representation of the workflow (View).FlowsChange: An event captured from the visual representation (select, drag, or drop).WorkflowChange: A change that occurred in the workflow.
Functions:
workflowView: Transforms aWorkflowinto its visualFlowsrepresentation.onFlowsChange: Triggered whenever the user interacts with theFlowsby selecting, dragging, or dropping a node, producingFlowsChangeobjects.toWorkflowChanges: ConvertsFlowsChange[]intoWorkflowChange[], acting as the Controller that bridges the View and the Model.applyWorkflowChanges: Applies the providedWorkflowChange[]against the current workflow to produce an updatedWorkflow.
Where It All Starts
We can take a look at how this architecture is implemented by going at the following file.
// src/app/page.tsx

// ...

function initialWorkflow(): Workflow {
  return {
    paths: { left: [], right: [] },
    items: [
      {
        id: "A",
        selected: false,
        position: { x: 200, y: 0 },
      },
    ],
  };
}

export default function Home() {
  const [workflow, setWorkflow] = useState(() => initialWorkflow());

  const onWorkflowChange = useCallback((changes: WorkflowChange[]) => {
    setWorkflow((workflow) => applyWorkflowChanges(changes, workflow));
  }, []);

  return (
    <div className="flex h-screen flex-col bg-white">
      <WorkflowView workflow={workflow} onWorkflowChange={onWorkflowChange} />
    </div>
  );
}
The useState hook returns a workflow that is passed to WorkflowView. Whenever the workflow needs to update, onWorkflowChange is called to apply the required changes.
The Workflow View
The code of the WorkflowView component can be found in the following file.
// src/shared/kits/workflow/components/workflow-view.tsx

// ...

interface WorkflowViewProps {
  workflow: Workflow;
  onWorkflowChange: (changes: WorkflowChange[]) => void;
}

export function WorkflowView({
  workflow,
  onWorkflowChange,
}: WorkflowViewProps) {
  const flows = useMemo(
    () => workflowView(workflow, onWorkflowChange),
    [workflow, onWorkflowChange],
  );

  const onFlowsChange = useCallback(
    (changes: TypedFlowsChange[]) => {
      const array = toWorkflowChanges(changes, workflow, flows);
      if (array.length) onWorkflowChange(array);
    },
    [onWorkflowChange, workflow, flows],
  );

  return (
    <FlowsView
      flows={flows}
      onFlowsChange={onFlowsChange}
      nodeTypes={nodeTypes}
      edgeTypes={edgeTypes}
    />
  );
}
The workflow prop is the model, holding the state; workflowView serves as the view, transforming that state into the visual representation; and toWorkflowChanges functions as the controller, mapping user interactions into updates to the workflow.
Select, Drag and Drop
Whenever a node is selected, dragged, or dropped, the onFlowsChange callback is triggered with FlowsChange objects describing the events.
Below is an example of a FlowsChange object.
{
  "type": "select",
  "node": {
    "id": "A/item",
    "type": "component",
    "entity": {
      "type": "item",
      "meta": {
        "type": "item",
        "id": "A"
      },
      "data": {}
    },
    "...": "..."
  },
  "selected": true
}
As shown, the object includes the node with the data we defined, in this case its type and id.
Workflow Changes
The properties of the FlowsChange object guide a chain of dispatcher functions toward the final handler, which is responsible for creating the WorkflowChange objects.
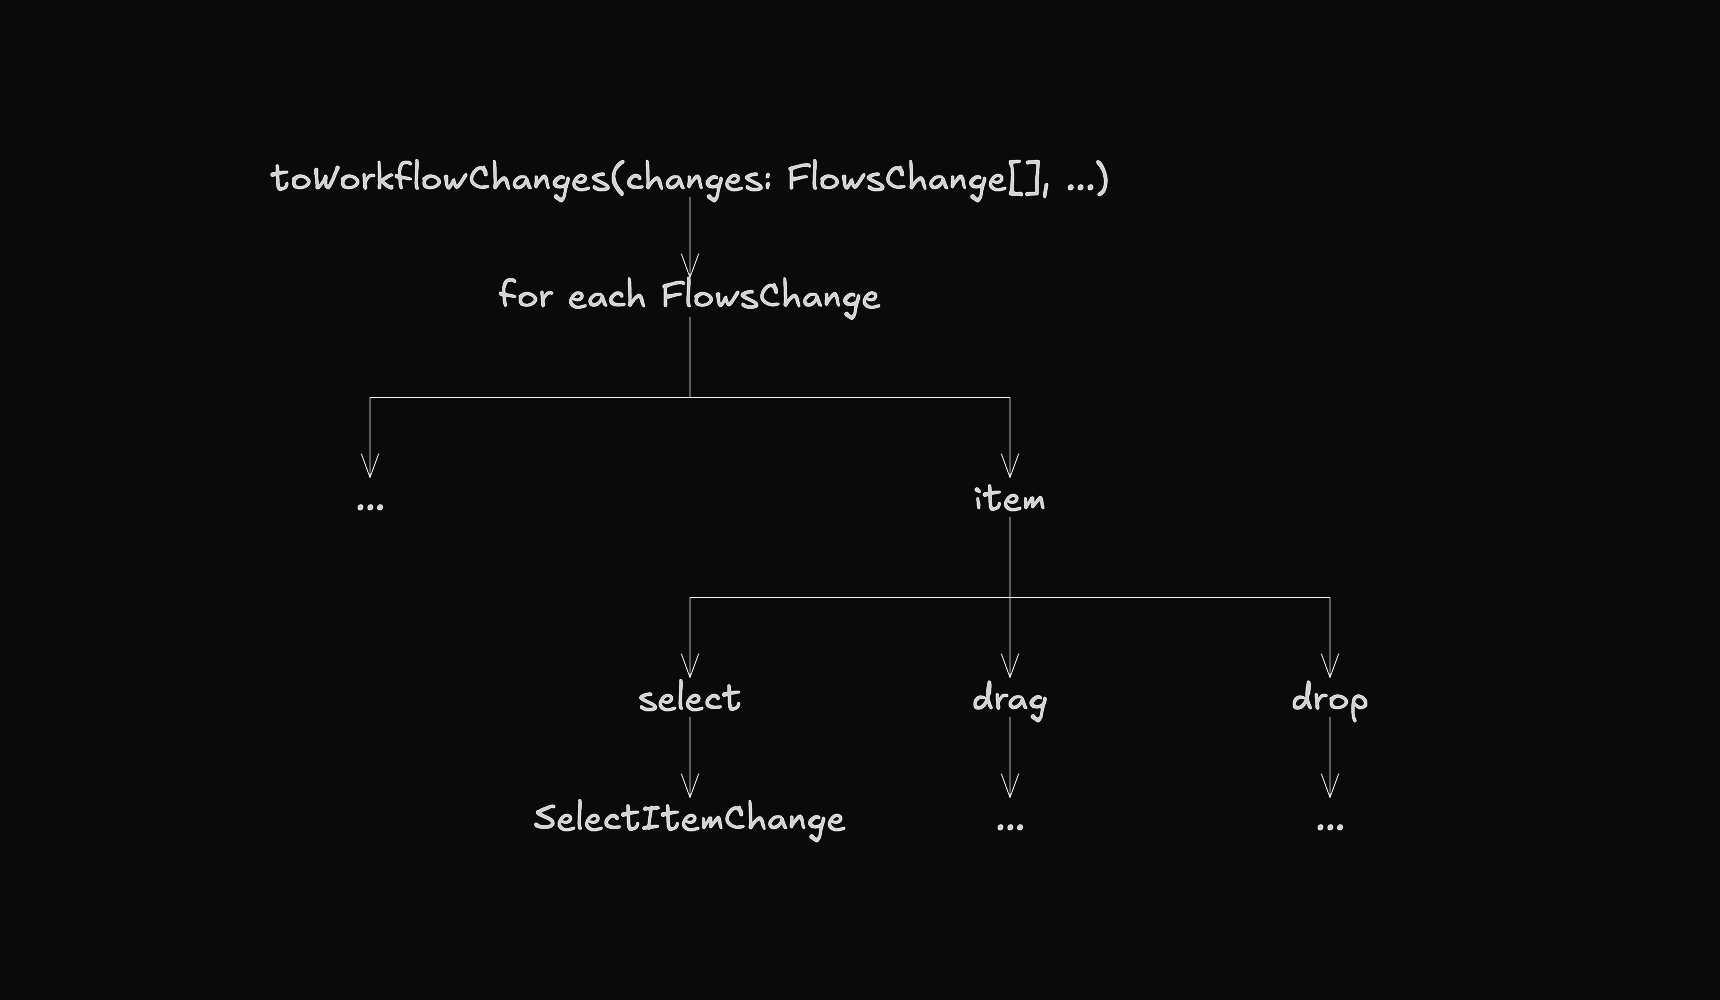
These dispatcher functions are built using the zet utility function, as shown in this file.
// src/shared/kits/workflow/mvc/controller/item/index.ts

// ...

interface Zet {
  object: ItemChange;
  nested: [];
  filter: ["type"];
  params: [Workflow, TypedFlows];
  return: WorkflowChange[];
}

const dispatch = zet<Zet>([], ["type"], {
  select: select,
  drag: drag,
  drop: () => [],
});

export function item(
  change: ItemChange,
  workflow: Workflow,
  flows: TypedFlows,
): WorkflowChange[] {
  return dispatch(change, workflow, flows);
}

export type SelectChange = Refine<{
  object: ItemChange;
  nested: [];
  filter: ["type"];
  narrow: "select";
}>;

export type DragChange = Refine<{
  object: ItemChange;
  nested: [];
  filter: ["type"];
  narrow: "drag";
}>;
For an in-depth explanation of how this utility works, visit thefollowing link.